Kubernetes: Building the New Cluster

Output of kubectl get nodes which will be referenced below for the node ages of 106 days

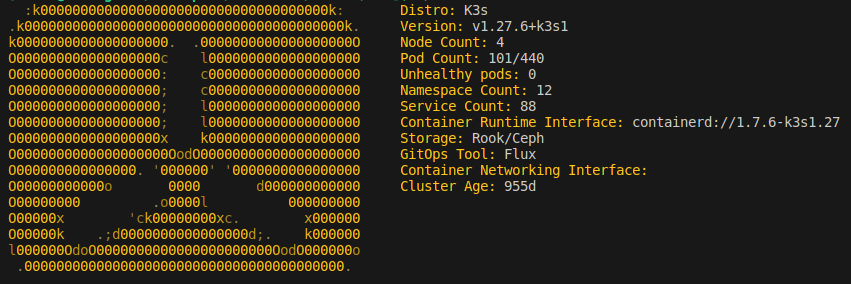
I am just a little slow at writing blog posts, but you know, thats alright. As I am sure you can tell from the image above, the cluster has been running in the new configuration for a few months at this point and besides some non-hardware specific issues, it has been a good transition. My server rack is a good bit quieter since being able to shut down the old HP server and probably running on a few less watts as well. While I did lose my cluster age counter being over 950 days in the process, the cluster is still the exact same one I started with as each component has been replaced Ship of Theseus style in the process.

Click here to read more...

Kubernetes: My Cluster Today

Nota Bene: This was written well before it got posted, cluster has been re-built, new post to come.

Kubefetch output showing basic cluster information including version, node count, pod count, age, etc.

I am on the verge of retiring some of my current infrastructure that has been serving me well for about four years. My current Kubernetes cluster has been operational on this hardware coming up on three years. It is surprising I have lasted this long before the itch to change something caused me to buy something new… But, before I go into anything about the hardware I have purchased and plans that I have for it, I figured I might as well document the state of my compute world today (at least as far as it pertains to my home Kubernetes cluster).

Click here to read more...

Home Theater: Screen Build

I have a few projects coming up that I hope to start blogging about, but to kick the series off I am going to document an older build (~5 years old). I have always wanted a “proper” home theater with a decent projector, nice screen, and immersive sound. That has, of course, taken a back seat to so many other priorities but I at least I have a screen to show for it.

The Design

I went for something I thought was straight forward: a wood frame and cloth screen. What I ended up with was something that was probably over-engineered/overkill for my use case but something I am happy with either way. It started with a couple drawings in my project notebook with an emphasis on preventing any sagging in the screen over time. The screen had to be supported from the sides due to a double-wide window being located behind the screen.

Screen Drawing from Notebook | © 2018 Winston R. Milling

I decided on a 128" screen early on, mostly because the projector I was looking at supported the size and it looked like it would fill the wall well. All in, it probably cost around $250 to build, including all the extra hardware bits I could probably do without.

Click here to read more...

Raspberry Pi Laptop Version 2

Some time after the first iteration of the Raspberry Pi Laptop, the Raspberry Pi Foundation suddenly released the Raspberry Pi 2, a backwards compatible quad-core upgrade to the original Raspberry Pi. I knew, just by the specs alone, I had to get one and use it as part of my lapdock setup. I believed it would solve all the issues I had with the original RPi model B. See below for the final build and read on for how it came together.

Raspberry Pi Laptop Version 2 - Back View

Click here to read more...

Raspberry Pi Laptop: Version 1

Somewhere around four years ago I had an unfortunate accident with my old HP 510 laptop which resulted in a thumb going through the LCD screen. This left me without a laptop, which was not too bad as I still had a perfectly fine desktop and an iPad. The only problem with this setup is that the desktop isn’t really portable and the iPad leaves a little to be desired in applications and multitasking. I did try sporadically for a while to get by with the iPad alone, following in the footsteps of people like Mark O’Connor, but it really just didn’t work well for me.

I had it in my head for a while during this time to try to do something interesting with the Raspberry Pi as all I had previously done was make it into another media center. I thought a laptop built around it would be great, but really didn’t find any good and cheap ways to achieve it. That was until I found the Lapdock series of netbook-like devices normally powered by smartphones. The lucky part to me is that the lapdock was a commercial flop leaving a lot of stock in the secondary market for cheap. I found a couple examples of people successfully using them with the RPi and figured, why not. I started doing some research and built the parts list for my own build.

Click here to read more...

Disclaimer: Any and all opinions presented here are my own and not representative of my employer(s); past, present, and future.